SAS UNIT REMOVAL/INSTALLATION
BHE081057030W01
-
Warning
-
• Handling the SAS unit improperly can accidentally deploy the air bag modules and pre-tensioner seat belt, which may seriously injure you. Read the service warnings and cautions before handling the air bag module. (See SERVICE WARNINGS.) (See SERVICE CAUTIONS.)
-
Caution
-
• Handling the SAS unit improperly can accidentally deploy the air bag modules and pre-tensioner seat belt, which may seriously injure you. If configuration is not completed before removing the SAS unit, DTC B2477 will be displayed.
1. Perform SAS unit configuration when replacing it. (See SAS UNIT CONFIGURATIONS.)
2. Turn the ignition switch to the LOCK position.
3. Disconnect the negative battery cable and wait for 1 min or more.
4. Remove the following parts:
-
(1) Console (See CONSOLE REMOVAL/INSTALLATION.)
-
(2) Glove compartment (See GLOVE COMPARTMENT REMOVAL/INSTALLATION.)
-
(3) Side panel (See SIDE PANEL REMOVAL/INSTALLATION.)
-
(4) Lower panel (See LOWER PANEL REMOVAL/INSTALLATION.)
-
(5) Column cover (See COLUMN COVER REMOVAL/INSTALLATION.)
-
(6) Steering shaft installation nuts (See STEERING WHEEL AND COLUMN REMOVAL/INSTALLATION.)
-
(7) A-pillar trim (See A-PILLAR TRIM REMOVAL/INSTALLATION.)
-
(8) Dashboard (See DASHBOARD REMOVAL/INSTALLATION.)
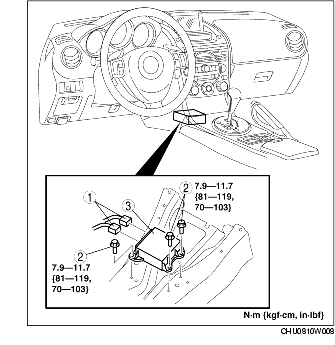
5. Remove in the order indicated in the table.
|
1
|
Connector
|
|
2
|
Bolt
|
|
3
|
SAS unit
|
6. Install in the reverse order of removal.
7. Turn the ignition switch to the ON position.
-
• If the SAS unit is replaced, turn the ignition switch to the ON position for 20 s or more after completing the configuration.
8. Verify that the air bag system warning light illuminates for approx. 6 s and goes out.
-
• If the air bag system warning light does not operate normally, refer to the on-board diagnostic system (air bag system) and perform inspection of the system.